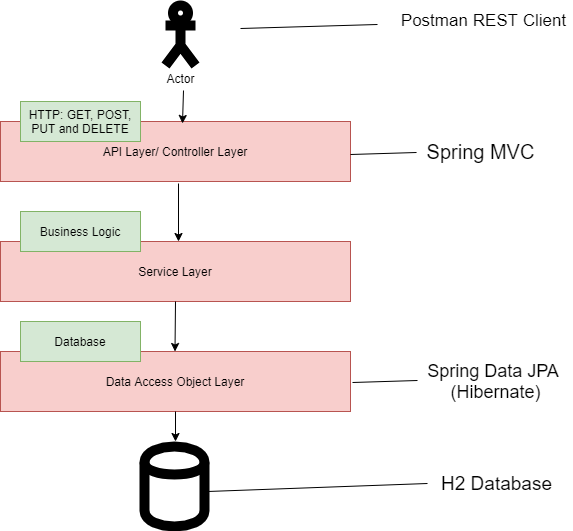

In this tutorial, we’ll build a Restful CRUD API for a simple user management application. We’ll first build the APIs to create, retrieve, update and delete a user, and then test them using Postman. This Spring Boot project is upgraded to Spring Boot 3 and Java 17.
Spring Boot has taken the Spring framework to the next level. It has drastically reduced the configuration and setup time required for Spring projects. You can set up a project with almost zero configuration and start building the things that actually matter to your application.
If you are new to Spring Boot and want to get started with it quickly, then this blog post is for you.
This tutorial is explained in detail in the video tutorial below:
We are building a simple User Management Application which has the following CRUD Rest APIs:

There are many ways to create a Spring Boot application. You can refer to the following articles to create a Spring Boot application:
Add the following dependencies in your pom.xml file:
 <dependency>
    <groupId>org.springframework.boot</groupId>
    <artifactId>spring-boot-starter-data-jpa</artifactId>
</dependency>
<dependency>
    <groupId>org.springframework.boot</groupId>
    <artifactId>spring-boot-starter-web</artifactId>
</dependency>
<dependency>
    <groupId>com.mysql</groupId>
    <artifactId>mysql-connector-j</artifactId>
    <scope>runtime</scope>
</dependency> Configure the database URL, username, and password in the src/main/resources/application.properties file to establish a connection with the database on startup:
spring.datasource.url = jdbc:mysql://localhost:3306/usersDB?useSSL=false
spring.datasource.username = root
spring.datasource.password = root

# Hibernate Properties
# The SQL dialect makes Hibernate generate better SQL for the chosen database
spring.jpa.properties.hibernate.dialect = org.hibernate.dialect.MySQLDialect

# Hibernate ddl auto (create, create-drop, validate, update)
spring.jpa.hibernate.ddl-auto = update
Don’t forget to change the spring.datasource.username and spring.datasource.password as per your MySQL installation. Also, create a database named usersDB in MySQL before proceeding to the next section.
You don’t need to create any tables. The tables will automatically be created by Hibernate from the User entity that we will define in the next step. This is made possible by the property spring.jpa.hibernate.ddl-auto = update.
Create a User model or domain class with the following fields: id, firstName, lastName, and email.
package net.javaguides.springboot.entity;

import jakarta.persistence.*;

@Entity
@Table(name = "users")
public class User {

    @Id
    @GeneratedValue(strategy = GenerationType.AUTO)
    private long id;

    @Column(name = "first_name")
    private String firstName;

    @Column(name = "last_name")
    private String lastName;

    @Column(name = "email")
    private String email;

    public User() {
    }

    public User(String firstName, String lastName, String email) {
        this.firstName = firstName;
        this.lastName = lastName;
        this.email = email;
    }

    public long getId() {
        return id;
    }

    public void setId(long id) {
        this.id = id;
    }

    public String getFirstName() {
        return firstName;
    }

    public void setFirstName(String firstName) {
        this.firstName = firstName;
    }

    public String getLastName() {
        return lastName;
    }

    public void setLastName(String lastName) {
        this.lastName = lastName;
    }

    public String getEmail() {
        return email;
    }

    public void setEmail(String email) {
        this.email = email;
    }
}Create a UserRepository to access User data from the database.
package net.javaguides.springboot.repository;

import org.springframework.data.jpa.repository.JpaRepository;
import net.javaguides.springboot.entity.User;

public interface UserRepository extends JpaRepository {
}
Define custom exceptions to handle specific application errors. In this case, a ResourceNotFoundException is thrown whenever a User with a given ID is not found in the database.
package net.javaguides.springboot.exception;

import org.springframework.http.HttpStatus;
import org.springframework.web.bind.annotation.ResponseStatus;

@ResponseStatus(value = HttpStatus.NOT_FOUND)
public class ResourceNotFoundException extends RuntimeException {

    private static final long serialVersionUID = 1L;

    public ResourceNotFoundException(String message) {
        super(message);
    }
} Create the REST APIs for creating, retrieving, updating, and deleting a User.
package net.javaguides.springboot.controller;

import java.util.List;

import org.springframework.beans.factory.annotation.Autowired;
import org.springframework.http.ResponseEntity;
import org.springframework.web.bind.annotation.*;

import net.javaguides.springboot.entity.User;
import net.javaguides.springboot.exception.ResourceNotFoundException;
import net.javaguides.springboot.repository.UserRepository;

@RestController
@RequestMapping("/api/users")
public class UserController {

    @Autowired
    private UserRepository userRepository;

    // Get all users
    @GetMapping
    public List getAllUsers() {
        return this.userRepository.findAll();
    }

    // Get user by id
    @GetMapping("/{id}")
    public User getUserById(@PathVariable long id) {
        return this.userRepository.findById(id)
                .orElseThrow(() -> new ResourceNotFoundException("User not found with id :" + id));
    }

    // Create user
    @PostMapping
    public User createUser(@RequestBody User user) {
        return this.userRepository.save(user);
    }

    // Update user
    @PutMapping("/{id}")
    public User updateUser(@RequestBody User user, @PathVariable long id) {
        User existingUser = this.userRepository.findById(id)
                .orElseThrow(() -> new ResourceNotFoundException("User not found with id :" + id));
        existingUser.setFirstName(user.getFirstName());
        existingUser.setLastName(user.getLastName());
        existingUser.setEmail(user.getEmail());
        return this.userRepository.save(existingUser);
    }

    // Delete user by id
    @DeleteMapping("/{id}")
    public ResponseEntity deleteUser(@PathVariable long id) {
        User existingUser = this.userRepository.findById(id)
                .orElseThrow(() -> new ResourceNotFoundException("User not found with id :" + id));
        this.userRepository.delete(existingUser);
        return ResponseEntity.ok().build();
    }
} We have successfully developed all the CRUD Rest APIs for the User model. Now it's time to deploy our application in a servlet container (embedded Tomcat).
Two ways we can start the standalone Spring Boot application:
$ mvn spring-boot:run
The demo of this tutorial is covered in the YouTube video tutorial below:
Congratulations! We successfully built a Restful CRUD API using Spring Boot, MySQL, JPA, and Hibernate.
You can find the source code for this tutorial on my GitHub repository. Feel free to clone the repository and build upon it.
Thank you for reading. Please ask any questions in the comment section below.